How I reverse appliquéd my cornerstone blocks on my BOM from The Quilt Show
(shown HERE if you wanna see)….. and OF COURSE
I'm BEHIND!!
In my DEFENSE, I chose to HAND APPLIQUE this quilt instead of the MACHINE
appliqué the others are doing and that takes a
little longer.
Thanks to Margo's video instruction at The Quilt Show site I was able to do these and have them come out just great!!
I did one BEEE-FORE I watched Margo's video….NO! NO! NO! It was hard to do and it was humpy bumpy laying up on top!
Whatever was I thinking!?!?
The ripping out was on!!
I cut a template out of an old file folder and cut out where the star would go.
I just followed my pattern for this part.
With a disappearing marker I traced the circle on the background following the template circle.
Drew another circle about 1/2 inch from outer circle…..I just eye balled it.
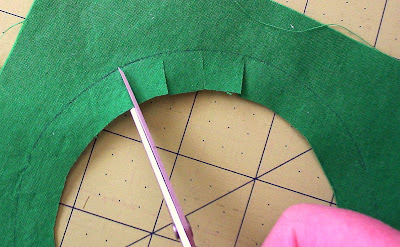
Cut on the inner circle line to create opening.
Snipped snipped snipped all the way around. Be sure NOT to snip through the line, just before it. You need to leave a fraction there that will turn under.
Paint liquid starch right on top of your marked line.
Place your template on top ( i roughly eye balled this too, seems i do a lot of that) trying to line up outer edges. The pins help to keep everything in place as you turn the edges over and press with a hot iron ( no steam ).
Oh look…..how CUTE!!
Gently remove template…fold background in half….finger press a crease to get 'line up' marks.
Time to play with the glue!!! I dabbed a dot of Elmers school glue on each star point.
I placed my green background on top….lined up finger pressed creases with a top and bottom star point and then kind of worked the other star points around the circle MAKING SURE to have ALL star points 'POINTY' and still visible. You sure don't want to have any chopped off looking points.
I used small pins in between the sections to secure what was not glued. I guess you could glue all the way around if you wanted, but this worked great without the added glue.
All that's left to do is to appliqué it down. You will do this from the top as I've tried to show here.
This part went fast too!
Here is a comparison photo. The one on the left is the reversed appliqué….the one on the right is the YUCKY floatin' around up on top one.
In summary, the REVERSE APPLIQUE process was SOOOOO fast and easy I couldn't believe it.
And besides, I think it looks much much better, don't you!!
I hope this was easy to understand, if you think I've left anything out or you have a question you can reply and ask in the comment section.
I am a fairly NEW hand appliquer and anytime I can get some help from others I REALLY
appreciate it. So THANKS again MARGO!
AND THEN WHAT HAPPENED?
A REWARD!
For a job well done!
Apricot Pecan Fruitcake with Pistachio chasers!!!


Wow! That looks amazing! But it's too much work for me. I don't have that much ambition when it comes to piecing things! LOL
ReplyDeleteI've done one similar and a friend/expert told me how to do it without the bumps and lumps- just like you! It is so much better, isn't it?
ReplyDeletewow, what a difference. That's why it's great to have a lot of tricks up your sleeve (or in your sewing basket) when you applique! Good job!
ReplyDeleteCan I have the reward without doing the work? Pleeeeeeeeeeeeeease?
ReplyDeleteGreat work on the circle - I love reverse applique - I did a Hawaiian quilt that way - it is blocks with different Hawaiian designs in each block and a border of dolphins - great fun. But I used needle turn reverse applique.
I wish I had watched this before I appliqued all my spools for my spool quilt.
ReplyDeleteLove this. Makes me want to applique a circle around something.
ReplyDeleteI am wondering if this would work with the freezer paper method too. Or did you like the stiffness of the file folder better? You really have a work of art on your hands with this quilt!!!
Bravo!
I would also be doing the hand applique, it looks great!
ReplyDeleteWonderful post! and thank you for showing us how to improve a quilt block. Love the colors you chose.
ReplyDeleteVery fitting finish for all your hard work! Beautiful.
ReplyDeleteI've never seen this technique! Very pretty block. That reward looks rich!
ReplyDeleteA good little tutorial! I think the reverse applique block looks better but they both look pretty good to me. What a great block!
ReplyDeleteThat's such a great technique, I love it. The stars look great.
ReplyDelete